Olive green has been having a moment in 2022, and we think it could be here to stay. From high fashion to homes, this muted tone is ideal for those who want to embrace the green trend but don't want to go for a dark or sage colour. If this sounds like you we've got the perfect tile for you.
Vintage is one of our best selling ranges and it's not hard to see why. The size and shape of the tiles means they fit into the metro category, but they are longer and slightly more narrow than a traditional subway tile which gives them a modern feel. The rustic design is highlighted by the glossy finish, making these tiles perfect for both big and small spaces because the light is reflected off their surface. When it comes to the colour Vintage Olive really hits the perfect balance of a natural green combined with on-trend olive.
Where can Vintage tiles be used?
Vintage Olive tiles are made of ceramic, so they can only be used on walls. But the good news is they can be installed in a range of patterns to create a unique design. Metro tiles are especially popular on splashbacks in kitchens and bathrooms, but also look great when used on walls in showers or as a feature in living areas.
How to install Vintage tiles?
First, take all the tiles out of their boxes and lay them out in the pattern you will be using. As these tiles have a high amount of variation in colour and design you may want to move them around so you get a good balance. This will also help to see where you need to make any cuts at the edges of your tiles and what tile trim you might need. When you are happy make sure you take a photo and make note of your choices - you could mark the back of the tiles to make it easier. 
Next prep your walls - they need to be flat and any holes need to be filled. If you are using the tiles in a wet area you may need to 'tank' or waterproof the tiles before installing them - this can be done with a paint on tanking solution, a membrane system, or tile backer boards (a waterproof version of plasterboard).
Once your walls are ready spread some tile adhesive on with a notched trowel using horizontal strokes. The notches create channels in the adhesive that allows the air to escape, ensuring your tile is fully bedded in the adhesive so it sticks better. Use spacers to make sure the gaps between the tiles are even. Wipe off any excess adhesive that gets onto the tiles as you go as it might be hard to remove at the end.
Once the adhesive has dried you can grout the tiles using a suitable adhesive and a grout float - this is like a soft trowel that helps push the grout into the joints. For edges that meet baths, sinks and worktops you will need to add a bead of silicone sealant - opt for an antimicrobial one to avoid any mould growth in wet areas.
Which grout should I use with Olive tiles?
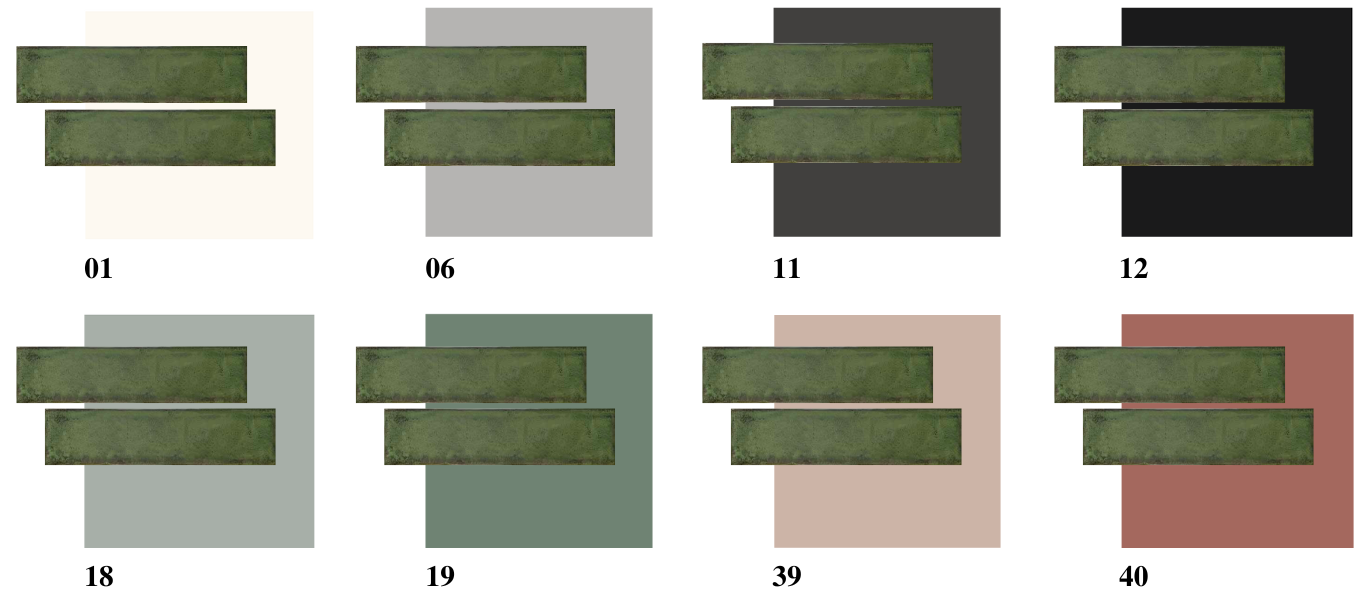
These olive green tiles are surprisingly versatile when it comes to grout colours. You could opt for a classic black or white, something neutral like a light grey, or mix it up with a blush pink grout. We've put together some swatches below to give you an idea of how the different colours look with the tiles. These are all Kerakoll Fugabella grouts, and each colour is also available in a matching silicone sealant.

Other colours in the Vintage range
Not a fan of the Olive Green colour or looking for another colour to pair it with? The Vintage range is also available in Blue, Pearl grey, Ivory and White.


